Step 1: Preparation and Cleaning
Start by rinsing the green onions under cool running water (about 50-60°F), rubbing each stalk gently between your fingers to dislodge any dirt trapped between the layers, especially near the root end where grit often collects. After rinsing, shake off excess water and pat them completely dry with a clean kitchen towel or paper towels—moisture on the surface will make chopping slippery and can dull your knife. Lay the onions on a cutting board with the root ends facing your non-dominant hand. Using a sharp chef's knife, trim off the hairy root ends (about 1/8 to 1/4 inch above the roots) and cut away any dry, wilted, or yellowed tips at the very top of the green stalks, removing no more than 1/2 inch unless they're damaged. For the cleanest cut, use a knife with a blade at least 8 inches long and sharpen it before starting—dull blades crush the onion fibers instead of slicing them, leading to uneven pieces and bruising. If you see dirt on your cutting board, wipe it away with a damp cloth to prevent cross-contamination.
Step 2: The Classic Round Cut
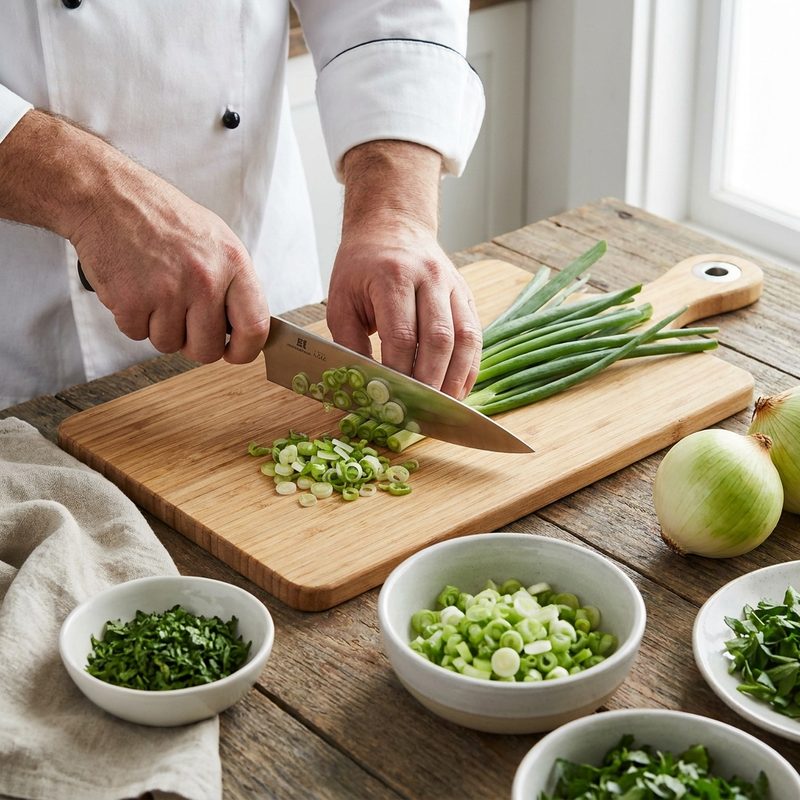
For most everyday recipes like soups, salads, and omelets, the round cut is ideal. Bunch 3-5 green onions together in a tight row, aligning the white bulbs and green tops so the bunch is uniform. With your fingers curled into a claw grip, tuck your knuckles against the blade for steady guidance. Using a sharp chef's knife, use a smooth rocking motion (the tip of the blade staying on the board as you slice) to crosswise cut the onions into thin, even rings about 1/8 to 1/4 inch thick—the thickness of a penny. You can use the entire onion, from the firm white bulb to the hollow green tops, depending on the flavor intensity your recipe requires: the white and light green parts offer a sharper, onion-like punch (similar to a mild leek), while the dark green tops are milder and add color. If you need only the white part, cut above the pale green transition (about 1-2 inches from the root). To avoid uneven slices, keep the knife moving rhythmically and don't press down too hard—let the blade's weight do the work. A common mistake is slicing too thick (over 1/2 inch), which leaves crunchy white chunks in a delicate sauce; if that happens, you can chop them into quarters lengthwise first. For an even finer dice for sauces, rock the knife through the rounds again to create small, uniform bits (1/16 inch).
Step 3: The Elegant Bias Cut
To create a more sophisticated look for stir-fries, noodle dishes, and plated garnishes, use a bias cut. Instead of cutting straight across, hold your knife at a consistent 45-degree angle relative to the onion's length. Align a single green onion or a small bunch (2-3 onions) on the board with the root end to your left (if right-handed). Place the knife tip on the board just behind the root end, tilt the blade to 45 degrees, and slice with a quick, decisive motion, pulling the knife toward you. This creates long, oval-shaped slices about 1 to 2 inches long and 1/4 inch wide, with more surface area for cooking—they'll caramelize faster and absorb sauces better than round cuts. This technique is especially effective for the thicker white and light green parts of the scallion (about the first 4-5 inches from the root), which hold their shape during stir-frying or grilling. For the dark green tips, use a radial bias cut by rolling the onion slightly with each slice to maintain the 45-degree angle—this produces uniform, elegant diamond shapes instead of ragged edges. If your slices come out uneven (some too thin, some too thick), steady the onion with a non-dominant hand and adjust the angle slightly downward to 30 degrees for a more stable cut. A bias cut can also be used to create 'oblique' pieces by cutting at a 60-degree angle for thicker slices (1/2 inch) that stand up better in roasted dishes. When cooking, spread them in a single layer in the pan and flip after 1-2 minutes for even browning.
Step 4: Creating Scallion Curls (Julienne)
For a high-end garnish that adds height and texture to dishes like fish, grilled meats, or dumplings, start by cutting the white and light green parts of the onion into 2-inch segments (about the length of your pinky finger). Discard or reserve the darkest green tops for another use—they are too delicate to hold a curl. Standing each segment upright on a flat end, slice lengthwise into very thin, matchstick-sized strips (about 1/16 to 1/8 inch wide). A sharp paring knife or a Japanese mandoline set to 1/16 inch works best; if the strips are thicker, they won't curl evenly. Aim for 4-6 even strips per segment. Place the strips into a bowl of ice water (with 3-4 ice cubes) for 5 to 10 minutes—the cold shock causes the outer cells to expand faster than the inner cells, naturally creating tight spirals that unfurl beautifully. For tighter curls, leave them in longer (up to 15 minutes), but beyond that they become limp. If your strips don't curl after 5 minutes, they may be too thick (slice them thinner next time) or the water is not cold enough—add more ice. You can also add a squeeze of lemon juice (1 teaspoon per cup of water) to brighten the flavor and prevent discoloration, but skip it if you want pure white curls. After curling, drain on paper towels and pat dry—excess water will dilute dressing or soup. These curls hold their shape for about 30 minutes at room temperature; for longer storage, keep them in cold water in the fridge for up to 2 hours, then drain and refresh just before serving. A common mistake is over-soaking, which makes them soggy; if that happens, spread them on a dry towel for 10 minutes to regain some crispness. For an alternative approach, cut the greens at a 60-degree angle to create feathery fronds instead of tight spirals.
Key Takeaways
- ✓ <html><ul><li>Always use a very sharp knife; a dull blade will crush the delicate cell walls of the onion rather than slicing through them, leading to a bruised appearance and faster wilting.</li><li>Utilize the 'claw grip' by tucking your fingertips inward and using your knuckles to guide the blade, ensuring maximum safety while chopping.</li><li>Save the white parts for the beginning of the cooking process (sautéing) and the green parts for the very end to preserve their color and fresh flavor.</li><li>If your green onions have gone a bit limp, soak them in cold water for 15 minutes to help them regain their crispness before cutting.</li></ul></html>