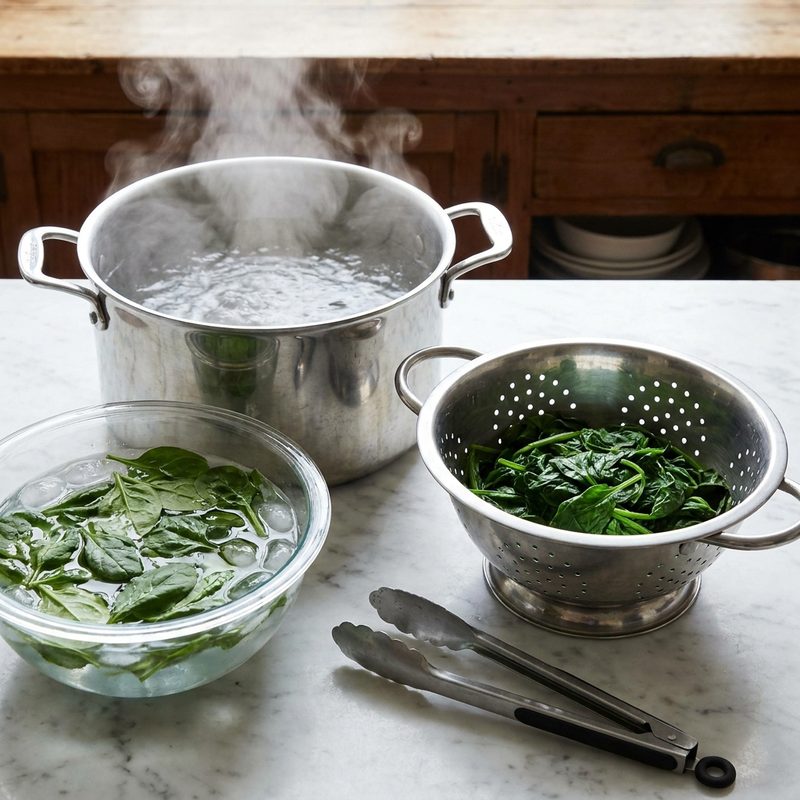
Step 1: Prep the Spinach and Ice Bath
Start by thoroughly washing your spinach in cold water to remove any grit or sand. Fill the sink or a large bowl with cold water (around 50°F/10°C) and submerge the spinach, swishing it gently. Lift the leaves out and let the grit settle; repeat if necessary. If you are using mature spinach, you may want to trim the tough lower stems, cutting no more than 1 inch (2.5 cm) from the base. For baby spinach, trimming is unnecessary. While the water is coming to a boil, prepare a large bowl filled with at least 4 cups (1 liter) of cold water and 2 cups of ice cubes (about 300 g). This ice bath should be large enough to hold the cooked spinach without overcrowding—a 3-quart (2.8 L) bowl works well. Place the ice bath near the stove so you can transfer the spinach quickly. The water temperature should be below 40°F/4°C; if you see the ice melting completely before use, add more ice.
Step 2: The Flash Boil
Bring a large pot of salted water to a rolling boil. Use at least 6 quarts (5.7 L) of water to ensure it doesn't cool too much when spinach is added. Add 1 tablespoon (15 g) of salt per quart of water—this helps preserve the chlorophyll, keeping the leaves bright green and also seasoning them lightly. The water should be at a full, vigorous boil (212°F/100°C at sea level) before you add the spinach. Once boiling, submerge the spinach leaves into the water all at once; use tongs or a spatula to push them down gently. For a single batch of up to 1 pound (450 g) of spinach, the leaves need only 30 to 60 seconds. Start counting immediately; at 30 seconds, check: you are looking for the leaves to wilt and turn a deep, vibrant green, with no raw or dark spots remaining. Overcooking will cause fading and a slimy texture. If the leaves are not fully wilted after 45 seconds, give them up to 15 seconds more; do not exceed 75 seconds total. For baby spinach, 20-30 seconds is sufficient. If you notice the water stops boiling after adding spinach, you have added too much—remove some leaves and blanch in smaller batches.
Step 3: The Cold Shock
Quickly remove the spinach from the boiling water using a slotted spoon or a spider strainer (a wide-mesh skimmer works best). Do not use tongs to lift large clumps, as they will trap hot water. Immediately plunge the hot leaves into the prepared ice bath. Stir them around vigorously for 15-20 seconds to ensure every leaf is chilled uniformly. You should see steam rising initially, but within 10 seconds the ice bath should stop steaming; if it doesn't, add more ice. This shocking technique stops the residual heat from overcooking the spinach, which would otherwise turn it mushy and gray. Let the spinach sit in the ice bath for at least 1 minute, but no longer than 5 minutes, or it will absorb water and become waterlogged. The leaves should feel cold to the touch (below 50°F/10°C). If some leaves are still warm, stir again and wait another 30 seconds. Common mistake: transferring spinach that hasn't fully cooled leads to continued cooking and a dull olive color.
Step 4: Drain and Squeeze
Once the spinach is completely cold, lift it out of the ice bath. Shake off excess water, then transfer it to a colander and let it drain for 1 minute. Squeezing out the excess moisture is the most important part of the process, especially if you plan to use it in recipes like spanakopita or dips. Use your hands to squeeze the spinach into small balls about the size of a golf ball (1.5-2 inches or 4-5 cm in diameter), applying firm, consistent pressure for 5-10 seconds until no more liquid drips. Alternatively, wrap the spinach in a clean kitchen towel (a flour-sack towel works best) and wring it out tightly—twist the ends in opposite directions until you can feel the towel is dry. Test by pressing with a paper towel; if it gets wet, squeeze again. For 1 pound (450 g) of raw spinach, you should have about 1/2 to 3/4 cup (120-180 g) of squeezed, cooked spinach. If the spinach feels slimy or has a sour smell after squeezing, it was stored too long before blanching (use within 24 hours for best results). Squeezed spinach can be stored in an airtight container in the refrigerator for up to 3 days, or frozen in portions for 3 months.
Key Takeaways
- ✓ <html><ul><li>Use a large pot to allow the spinach enough room to move, ensuring even cooking.</li><li>Don't skip the salt in the boiling water; it seasons the greens and helps maintain that fresh look.</li><li>If you are blanching large quantities, work in small batches to keep the water temperature from dropping too much.</li><li>Save the nutrient-rich blanching water for use in soups or stews instead of pouring it down the drain.</li></ul></html>