Step 1: Preparation and Cleaning
Start by rinsing your green onions under cool running water to remove any grit or dirt trapped between the layers. Use your fingers to gently separate the layers near the root end, where soil often hides. Pat them dry thoroughly with a paper towel; dry onions are easier and safer to slice because they won't slip on the cutting board. Lay the onions in a neat pile and trim off the stringy root ends—cut just above the root, about 1/8 inch above the white base—and any wilted or yellowing tips from the green tops, removing no more than 1/2 inch from the top. If the outer layer of the white bulb is slimy or discolored, peel it away and discard. For a standard bunch of 6 to 8 onions, this prep takes about 2 minutes. If you skip drying, the knife may slide, increasing the risk of uneven cuts or a cut finger.
Step 2: The Basic Round Cut
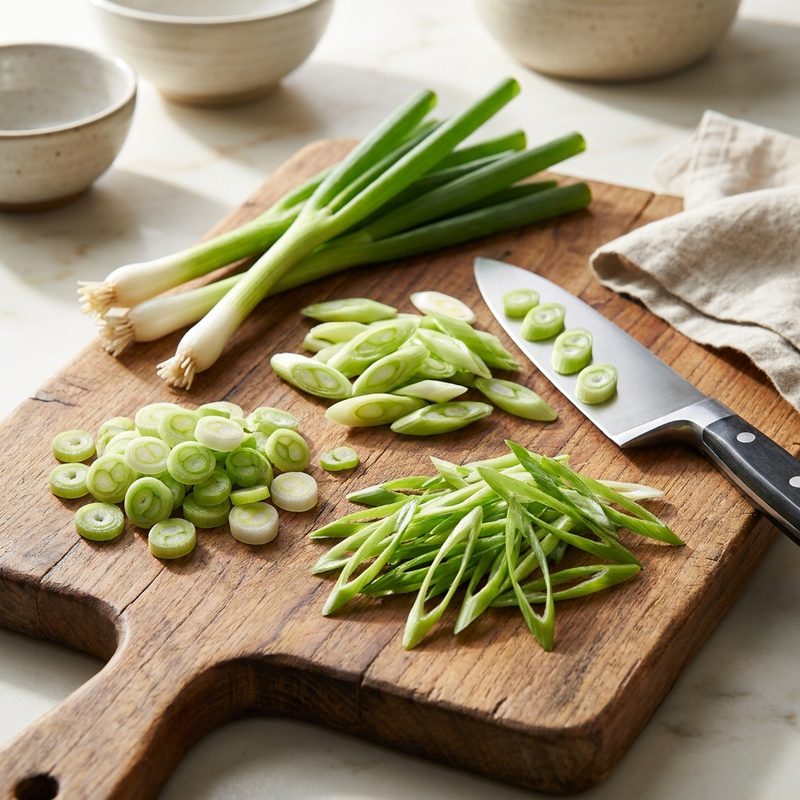
This is the most common technique for soups, salads, and tacos. Bundle several onions together, aligning the white ends so the layers stack evenly. Hold the bundle with your non-dominant hand using the 'claw' grip: curl your fingertips inward, resting your knuckles against the side of the blade to guide it. Using a sharp chef's knife (an 8-inch blade works best), make thin, perpendicular slices through the bundle, aiming for 1/8-inch to 1/4-inch thickness. Continue slicing from the white base up through the dark green tops until you reach the ends. For uniform pieces, apply even pressure and let the knife do the work—do not saw back and forth, which can crush the layers. You should hear a clean, crisp sound as the blade cuts through. If the slices stick to the knife, wipe the blade with a damp cloth every 4 to 5 cuts. For a finer dice (e.g., for garnishing), slice at 1/16-inch intervals; for chunkier pieces (e.g., for stir-fries), use 1/2-inch cuts. If the onion starts to roll, flatten the bundle with your palm before continuing.
Step 3: The Bias (Diagonal) Cut
For a more elegant look often found in stir-fries and Asian cuisine, use a bias cut. Instead of holding your knife perpendicular to the onion, angle it at 45 degrees relative to the cutting board. Slice through the onion at this angle to create long, oval-shaped pieces that are about 1 to 2 inches long. This technique increases the surface area of the onion by roughly 30%, allowing it to cook faster—about 1 minute less in a hot wok—and release more flavor while providing a beautiful visual texture. To maintain consistency, rotate the onion a quarter turn after each slice so the angle stays constant. For a more dramatic effect, use a 30-degree angle for longer, thinner ovals. If the pieces are uneven, check that your knife is at a steady angle; practice on a single onion first. This cut works best for the white and light green parts; the dark green tops can be sliced similarly but may tear if too thin. For a substitute, you can use a mandoline set to a 45-degree angle, but watch your fingertips.
Step 4: Making Shredded Scallion Curls
To create fancy garnishes for ramen noodles or seafood, cut a three-inch section of the green part of the onion, starting about 2 inches below the top. Slice it lengthwise into very thin, needle-like strips (julienne), aiming for 1/16-inch width or less. Use a sharp paring knife or a vegetable peeler for ultra-fine strips. Immediately drop these strips into a bowl of ice water—use 2 cups of water with 4 to 5 ice cubes. Within 5 to 10 minutes, the strips will curl up into decorative ringlets due to the difference in cell wall structure between the inner and outer layers. Drain and pat dry before using as a topper for your finished dish. If the curls are too tight, soak for only 3 minutes; if they don't curl at all, the water may be too warm (add more ice) or the strips too thick (re-slice thinner). For a variation, add a splash of rice vinegar to the water for a subtle tang. Avoid over-soaking, as the curls can become limp after 15 minutes. Use immediately for best texture.
Key Takeaways
- ✓ <html><ul><li>Always use a very sharp knife to avoid crushing the delicate cellular structure of the onion, which can lead to a 'slimy' texture and a bitter taste.</li><li>The white and light green parts have a stronger, more pungent flavor suitable for cooking, while the dark green parts are milder and best used raw as a garnish.</li><li>To speed up the process, use a rubber band to hold a bundle of green onions together while slicing; just be sure to slide the band back as you move your knife.</li><li>Don't throw away the root ends! You can place them in a small jar of water on your windowsill to regrow fresh green onions indefinitely.</li></ul></html>